Running an analysis starting from multiple inputs
A common use case is to have a set (or sets) of SARS-CoV-2 sequences which you wish to analyse together. For instance, you may have a set of freshly generated genomes which you wish to analyse in the context of a larger, worldwide set of genomes such as those found on GISAID. This tutorial works through such a scenario.
We have partitioned the data contained within the main example dataset into two sets:
An “Australian” dataset, containing 91 genomes from Victoria, Australia. These were genomes uploaded to NCBI from Torsten Seemann et al., but are used in this tutorial to represent a small subset of genomes which may not yet be public.
A “worldwide” dataset for context. Often this would be the entire NCBI/GISAID dataset, but here only includes 327 genomes for speed and data-sharing reasons.
Our aim is to produce an analysis of the 91 Australian genomes with select worldwide genomes for context. To achieve this, we wish to apply different input-dependent filtering, subsampling and colouring steps.
Overview of the files used in this tutorial
The sequences and metadata for this tutorial are in data/example_multiple_inputs.tar.xz and must be decompressed via tar xf data/example_multiple_inputs.tar.xz --directory data/.
You should now see the following starting files:
data/example_metadata_aus.tsv           # Aus data (n=91) from Seemann et al.
data/example_sequences_aus.fasta
data/example_metadata_worldwide.tsv     # Worldwide, contextual data (n=327)
data/example_sequences_worldwide.fasta
The files are small enough to be examined in a text editor – the format of the worldwide metadata is similar to the nextmeta.tsv file which you may download from GISAID, whereas the format of the Australian metadata is more limited, only containing sampling date and geographic details, which may be more realistic for a newly generated sequencing run.
Note: see data/example_metadata.tsv for the full metadata of these Australian samples, we’ve intentionally restricted this here to mimic a real-world scenario.
The build-specific configs etc are in my_profiles/example_multiple_inputs
my_profiles/example_multiple_inputs/config.yaml
my_profiles/example_multiple_inputs/builds.yaml # this is where the input files and parameters are specified
my_profiles/example_multiple_inputs/my_auspice_config.json
Setting up the config
You can define a single input dataset in builds.yaml as follows.
inputs:
  - name: my-data
    metadata: "data/metadata.tsv"
    sequences: "data/sequences.fasta"
For multiple inputs, you can add another entry to the inputs config list.
Here, we will give them the names “aus” and “worldwide”:
# my_profiles/example_multiple_inputs/builds.yaml
inputs:
  - name: "aus"
    metadata: "data/example_metadata_aus.tsv"
    sequences: "data/example_sequences_aus.fasta"
  - name: "worldwide"
    metadata: "data/example_metadata_worldwide.tsv"
    sequences: "data/example_sequences_worldwide.fasta"
Snakemake terminology
Inside the Snakemake rules, we use a wildcard origin to define different starting points.
For instance, if we ask for the file results/aligned_worldwide.fasta then wildcards.origin="worldwide" and we expect that the config has defined
a sequences input as shown above.
How is metadata combined?
The different provided metadata files (for aus and worldwide, defined above) are combined during the pipeline, and the combined metadata file includes all columns present across the different metadata files.
Looking at the individual TSVs, the worldwide metadata contains many more columns than the aus metadata does, so we can expect the the aus samples to have many empty values in the combined metadata.
In the case of conflicts, the order of the entries in the YAML matters, with the last value being used.
Finally, we use one-hot encoding to express the origin of each row of metadata.
This means that extra columns will be added for each input (e.g. aus and worldwide), with values of "yes" or "no", representing which samples are contained in each set of sequences.
We are going to use this to our advantage, by adding a coloring to highlight the source of sequences in auspice via my_profiles/example_multiple_inputs/my_auspice_config.json:
"colorings": [
  {
    "key": "aus",
    "title": "Source: Australia",
    "type": "boolean"
  }
],
"display_defaults": {
  "color_by": "aus"
}
Input-specific filtering parameters
The first stage of the pipeline performs filtering, masking and alignment (note that this is different to subsampling).
If we have multiple inputs, this stage of the pipeline is done independently for each input.
The parameters used for filtering steps are typically defined by the “filter” dict in the builds.yaml, with sensible defaults provided (see defaults/parameters.yaml).
For multiple inputs, we can overwrite these for each input.
As an example, in this tutorial let’s ensure we include all the aus samples, even if they may be partial genomes etc
# my_profiles/example_multiple_inputs/builds.yaml
filter:
  aus:
    min_length: 5000 # Allow shorter (partial) genomes
    skip_diagnostics: True # skip diagnostics (which can remove genomes) for this input
Subsampling parameters
The second stage of the pipeline subsamples the (often large) dataset.
By this stage, the multiple inputs will have been combined into a unified alignment and metadata file (see above), however we may utilise the fact that the combined metadata has additional columns to represent which samples came from which input source (the columns aus and worldwide).
This allows us to have per-input subsampling steps.
In this example, we want to produce a dataset which contains:
All of the samples from the
ausinput (i.e. all of the Australian genomes)A worldwide sampling which prioritises sequences close to (1)
A random, background worldwide sampling
# my_profiles/example_multiple_inputs/builds.yaml
builds:
  multiple-inputs:
    subsampling_scheme: custom-scheme # use a custom subsampling scheme defined below

# STAGE 2: Subsampling parameters
subsampling:
  custom-scheme:
    # Use metadata key to include ALL from `input1`
    allFromAus:
      exclude: "--exclude-where 'aus!=yes'" # subset to sequences from input `aus`
    # Proximity subsampling from `worldwide` input to provide context
    worldwideContext:
      exclude: "--exclude-where 'aus=yes'" # i.e. subset to sequences _not_ from input `aus`
      group_by: "year"    # NOTE: `augur filter` needs this to use `max_sequences` (TODO)
      max_sequences: 100
      priorities:
        type: "proximity"
        focus: "allFromAus"
    worldwideBackground:
      exclude: "--exclude-where 'aus=yes'"
      group_by: year month
      seq_per_group: 5
Run the build
The following commands will run this tutorial
tar xf data/example_multiple_inputs.tar.xz --directory data/ # make sure you have input files!
snakemake --profile my_profiles/example_multiple_inputs -f auspice/ncov_multiple-inputs.json
The resulting JSON can be dropped onto auspice.us for visualization.
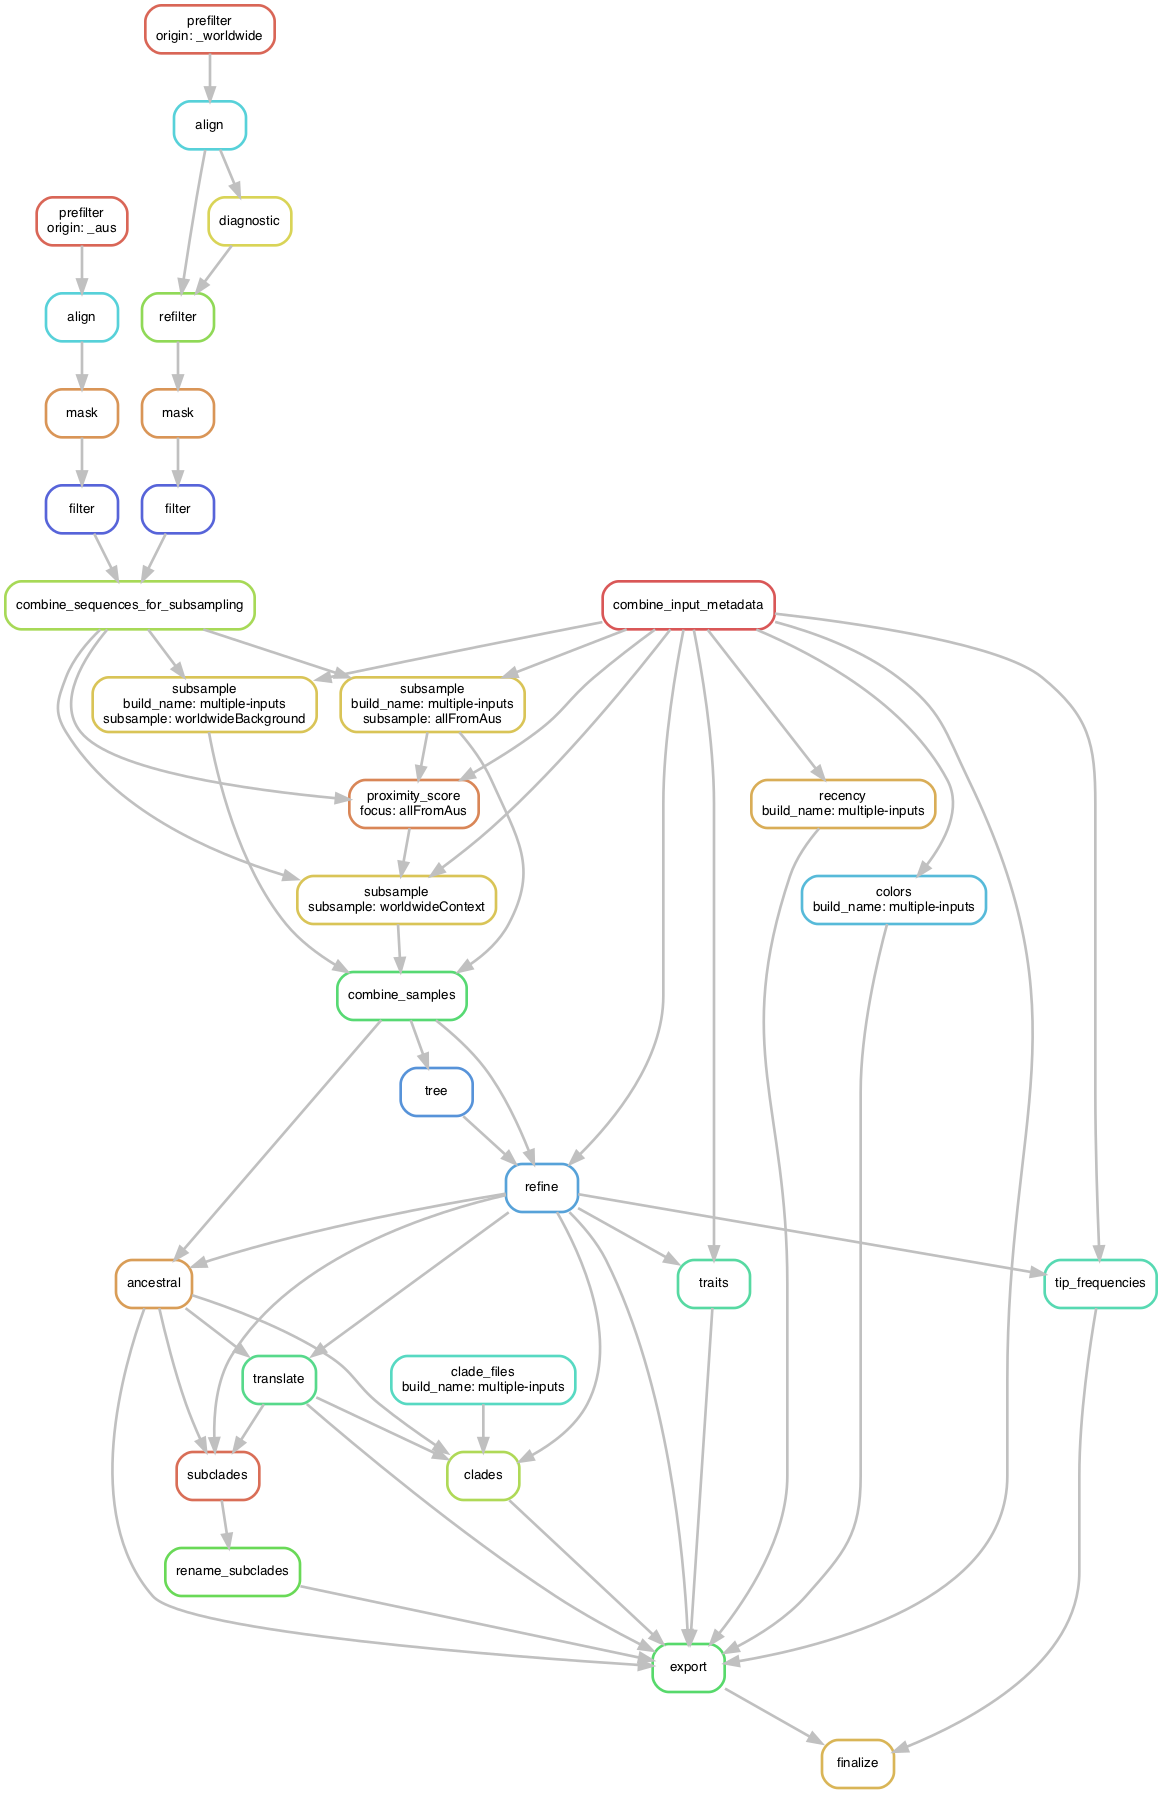
The following figure shows the graph (DAG) of steps which Snakemake will run to produce the target auspice JSON.
You can generate this yourself via
snakemake --profile my_profiles/example_multiple_inputs -f auspice/ncov_multiple-inputs.json --dag | dot -Tpdf > dag.pdf.
Extra examples
What if I need to preprocess input files beforehand?
A common use case may be that some of your input sequences and/or metadata may require preprocessing before the pipeline even starts, which will be use-case specific.
To provide an example of this, let’s imagine the situation where we haven’t uncompressed the starting files, and our “custom preprocessing” step will be to decompress them.
In other words, our preprocessing step will replace the need to run tar xf data/example_multiple_inputs.tar.xz --directory data/.
We can achieve this by creating a snakemake rule which produces all of (or some of) the config-specified input files:
# my_profiles/example_multiple_inputs/rules.smk
rule make_starting_files:
    message:
        """
        Creating starting files for the multiple inputs tutorial by decompressing {input.archive}
        """
    input:
        archive = "data/example_multiple_inputs.tar.xz"
    output:
        # Note: the command doesn't use these, but adding them here makes snakemake
        # aware that this rule produces them
        aus_meta = "data/example_metadata_aus.tsv",
        aus_seqs = "data/example_sequences_aus.fasta",
        world_meta = "data/example_metadata_worldwide.tsv",
        world_seqs = "data/example_sequences_worldwide.fasta"
    shell:
        """
        tar xf {input.archive} --directory data/
        """
And then making our build aware of these custom rules:
# my_profiles/example_multiple_inputs/builds.yaml
custom_rules:
  - my_profiles/example_multiple_inputs/rules.smk
What about if my starting files are stored remotely?
Currently we can handle files stored on S3 buckets rather than remotely by simply declaring this as the input location:
# your pipeline's builds.yaml config
inputs:
  - name: worldwide
    metadata: "s3://your_bucket_name/metadata.tsv"
    sequences: "s3://your_bucket_name/sequences.fasta.xz"
If your S3 bucket is private, make sure you have the following env variables set:
$AWS_SECRET_ACCESS_KEYand$AWS_ACCESS_KEY_ID.
You may use
.xzor.gzcompression - we automatically infer this from the filename suffix.