Manually Labeling Clades on a Nextstrain Tree
If you look at the Nextstrain Seasonal Influenza tree, you’ll see that the clades are labelled (for example, 3c2, 3c2.A, 3c3 etc.). However labelled clades are not a default in Nextstrain builds. You may want to add clade labelling to your Nextstrain trees to more easily describe certain aspects of the tree, point out agreed-upon groups that are accepted by the field, or to facilitate zoomed views on the tree when using Nextstrain narratives. This bit of documentation describes how to add clade labeling to your Nextstrain build.
Finding Clade Defining Nucleotide Mutations
You can find clade-defining mutations by exploring a Nextstrain tree that you have built previously. By default, Nextstrain trees will show amino acid mutations. While you can certainly define clades by amino acid changes, there may be many clades that you would like to label for which no amino acid mutations have occurred. Thus, it may work better to define clades using nucleotide mutations, which occur more frequently.
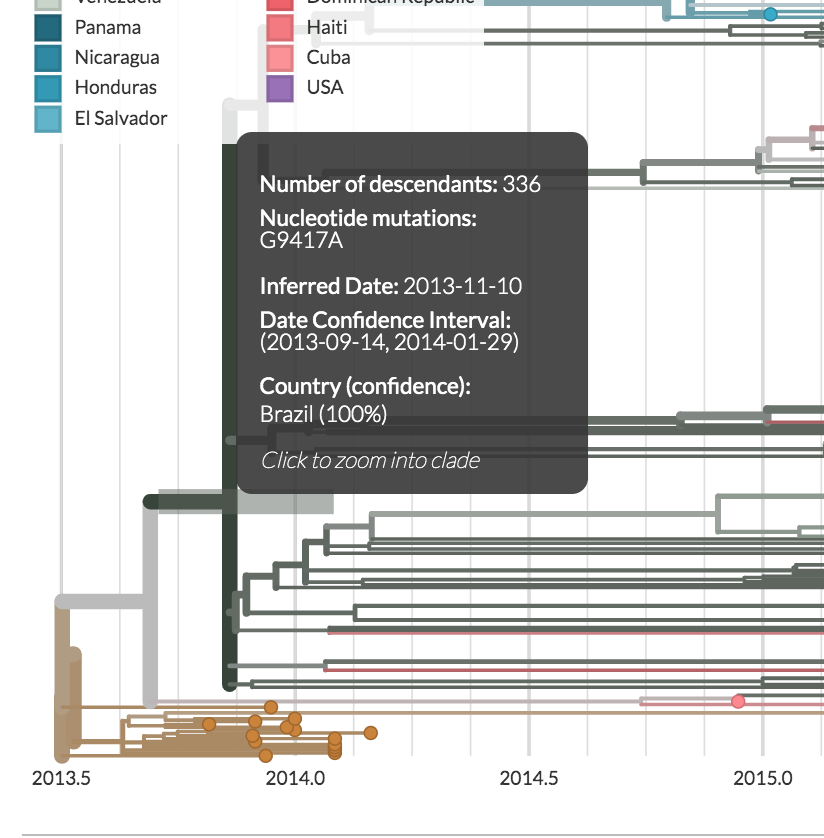
Then, head back to the tree. When you hover over a branch in the tree, a dark grey window pops up.
Inside this window, you’ll see that there’s a header that says Nucleotide Mutations:.
In the image below, the clade descended from this branch is defined by a mutation from G to A at site 9417 in the genome.
This is the information that you’ll need for defining your clades.
Make a TSV File Containing your Clade Mutations
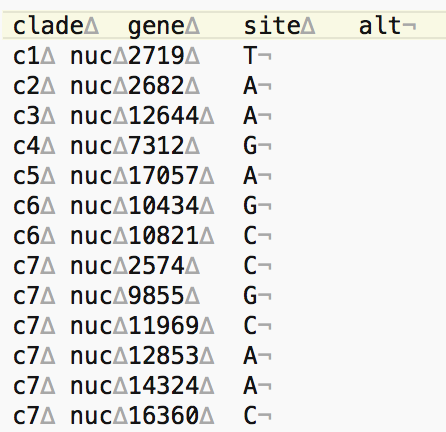
The header of this TSV file should have the following entries: clade\tgene\tsite\talt
cladeis the name of your clade, whatever you want to refer to it as.geneshould be entered asnucif you are using nucleotide mutations. If you are using amino acid mutations, it would be the gene the amino acid mutation is in, as that gene is defined within the build.siteis the position in the genome where the mutation occurred.altis the nucleotide that the site mutated to. For example if the nucleotide mutation isG9417A, thenaltwould beA.
Note that some clades will be defined by more than one mutation. To avoid any conflicts with other clades, you should list all the mutations in the TSV file (using the same clade name, but different site information). A picture of what this tsv file should look like, showing invisible characters, is given below. Note that clades c1, c2, c3, c4, and c5 are defined by only one mutation, but that c6 is defined by two mutations, and thus has two entries, one for each mutation. Along the same lines, there are six mutations defining clade c7, and thus there are six entries in the tsv file.
The
∆and¬characters are displayed by the Atom text editor to represent “tab” and “(unix) end of line” characters, respectively.
It doesn’t really matter where you save your clades.tsv file (as long as you know the path to the file), we usually save this file within the config directory of our workflows, as this is where other files such as colors.tsv are usually kept within Nextstrain analysis directories.
Side note: Please avoid numerical labelling for the clades, which currently cause issues. I.e. instead of using
1,2,3etc, add a letter ahead of the number - for instancec1,c2,c3.
Changing your Workflow to Add Clade Labeling by Editing your Snakefile
Clade labelling is not a default task in the standard Nextstrain workflow. However, you can certainly add it to your workflow! To do so, you’ll need to edit your Snakefile.
The first thing you’ll need to edit is rule files:. Here, you’ll need to add an entry to the params section that references your file. For example, you could add clades = config/clades.tsv to the params section. The important thing here is that the path to your TSV file is correct. This is what this looks like for us in one of our Snakefiles:
rule files:
    params:
        input_fasta = "data/sequences.fasta",
        metadata = "data/metadata.tsv",
        dropped_strains = "config/dropped_strains.txt",
        reference = "config/reference.gb",
        colors = "config/colors.tsv",
        lat_longs = "config/lat_longs.tsv",
        auspice_config = "config/auspice_config.json",
        root_name = "lab-outgroup",
        clades = "config/clades.tsv"
Next, you’ll need to add a rule to the Snakefile that tells the workflow to perform the clade labelling. We usually place this rule after the translate rule.
Here’s an example rule that we wrote for clade labeling.
rule clades:
    message: " Labeling clades as specified in config/clades.tsv"
    input:
        tree = rules.prune_outgroup.output.tree,
        aa_muts = rules.translate.output.node_data,
        nuc_muts = rules.ancestral.output.node_data,
        clades = files.clades
    output:
        clade_data = "results/clades.json"
    shell:
        """
        augur clades --tree {input.tree} \
            --mutations {input.nuc_muts} {input.aa_muts} \
            --clades {input.clades} \
            --output {output.clade_data}
        """
Finally, you’ll need to edit the export rule to make sure that the clade labelling information gets added to the Auspice JSONs. You’ll need to add the clade data as an input to export, and you’ll also need to include it as an argument in the --node-data flag of the auspice export command.
For instance, this is what our export command looks like:
rule export:
    message: "Exporting data files for auspice"
    input:
        tree = rules.prune_outgroup.output.tree,
        metadata = rules.combine_strain_epi_names.output.metadata,
        branch_lengths = rules.refine.output.node_data,
        traits = rules.traits.output.node_data,
        nt_muts = rules.ancestral.output.node_data,
        aa_muts = rules.translate.output.node_data,
        colors = files.colors,
        lat_longs = files.lat_longs,
        clades = rules.clades.output.clade_data,
        auspice_config = files.auspice_config
    output:
        auspice_tree = rules.all.input.auspice_tree,
        auspice_meta = rules.all.input.auspice_meta
    shell:
        """
        augur export \
            --tree {input.tree} \
            --metadata {input.metadata} \
            --node-data {input.branch_lengths} {input.traits} {input.nt_muts} {input.clades} {input.aa_muts} \
            --colors {input.colors} \
            --lat-longs {input.lat_longs} \
            --auspice-config {input.auspice_config} \
            --output-tree {output.auspice_tree} \
            --output-meta {output.auspice_meta}
        """
Note that in the input we have clades = rules.clades.output.clade_data and in the --node-data flag, we have an argument {input.clades}.
Important: You may have to edit the names depending on how you named your rules, your inputs, and your outputs. For example, in the export rule above, we have a line that says clades = rules.clades.output.clade_data. This is formatted this way because we have a rule called clades and the output from that rule is called clade_data. However if our rule had been called something different, say label_clades_on_my_tree, then the referenced file would have to be labelled rules.label_clades_on_my_tree.output.clade_data. This is also true for however you name the output files.